Friday, May 31, 2013

Easy Spring Rolls w/ Peanut Hoisin Dipping Sauce

 
     Its about summertime (with these 90 degree days it definitely feels like summer) so I'm starting to crave, ya know, summery food......duhhh. I want crunchy, crispy veggies and fresh and light meals (alongside a greasy grilled burger or hotdog, but we'll get to that another time). These spring rolls are so simple, a great food for summer with no oven necessary, and not to mention they're healthy and low calorie, so you won't feel like a beached whale laying out on your towel after eating a few of these ;)

Colorful deliciousness!


       This recipe has no meat added, but of course you could add chicken, shrimp or even tofu. Without adding meat, however, these suckers are sooo cheap! A package of 40 rice papers is under $2 and a package of broccoli slaw is also under $2. It doesn't get much better than that! Plus it's a great change up from the usual snack and an easy way to get your veggies in. Making these once was all it took to convince me to do it again....alllll summer!

       It's a simple recipe because of the pre-shredded vegetables. The only thing I had to cut myself besides the avocado was the jicama (pronounced: ji [like an "h" sound] - ca - ma), and let me guess, you're asking yourself "What the heck is a jicama?!" (Maybe you already know, but I was clueless) My sister, who is vegan and often eats random foods like this, claims it's halfway between a potato and an apple, which seemed pretty accurate to me. If you're looking for a more scientific answer, an random anonymous person on yahoo answers says that "it's a sweet, root vegetable that looks like a turnip. It can be eaten raw and is often found in salads." Seems trustworthy enough to me, so there you have it people!

        I made a hoisin peanut butter sauce to dip it in and the sweet nutty flavor went great with the veggies, and also made it more filling. It was so good that both my mom and I said we could eat it by the spoonful.....I'm not gonna lie, I definitely snuck in a few finger dips ;)


         You could also try other variations of vegetables to stuff in the rolls, and rice goes great inside them as well. Get creative with it!


Easy Spring Rolls
Makes approximately 25
Ingredients:
12 oz package broccoli slaw (carrots, cabbage, broccoli etc)
1 additional cup shredded carrots
1/2 jicama, peeled and shredded
2 tbsp rice vinegar
1 tsp sugar
1/4-1/2 tsp salt
2 avocados
1 tbsp lemon juice
pepper
Rice paper for wrapping

Directions:
Put broccoli slaw, shredded carrots and jicama (can easily use cheese grater to shred) in large bowl.
Mix together rice vinegar, sugar and salt in small bowl, add to slaw mixture and toss to coat.
Cut avocado, remove pit and slice into thin strips, mix with lemon juice and season with pepper. 
Dip one rice paper at a time in a large bowl of warm water for 5-10 seconds, until they're flexible. Put flat on plate, top with broccoli slaw mixture and avocado. Roll up the wrapper, folding in the sides halfway through.


Hoisin Peanut Butter Dipping Sauce
Ingredients:
3/4 cup peanut butter
1/2 cup hoisin sauce
1 tbsp low sodium soy sauce
3 tbsp lemon juice
2 tsp sesame oil
2 scallions, finely chopped
2 tbsp water
Hot sauce - optional

Directions:
Mix it all together!
(add more water if desired for consistency)


Happy Summer Eating!


Monday, May 27, 2013

Ham and Veggie Mac n' Cheese


       Simple, hearty, filling, cheap and healthier mac and cheese. Use up leftover ham, throw in some frozen veggies and a few fresh chopped ones, smother it all in a cream sauce with skim milk and sharp cheddar and toss it with healthy whole wheat pasta. It's about halfway between mac and cheese and a vegetable casserole because of the ratio of noodles to veggies, but it's great that way! It's a mac and cheese you don't have to feel bad about stuffing your face with (to an extent....) ;P


          Just like most recipes I post, there is plenty of room for alterations. I used steamed frozen broccoli, frozen corn, chopped onion and red bell pepper, but there are endless options. You could use frozen green beans or a frozen mixed vegetable mixture (peas, corn, carrots etc) and of course any type of bell pepper. Just load in the vegetables, whatever you have on hand, and pack in the nutrients!


If you aren't too used to eating whole wheat pasta, try using half whole wheat noodles and half regular. This is what my mom does with her home ec class, and you can hardly tell the difference!


Ham and Veggie Mac n' Cheese
Ingredients:
10 oz whole wheat pasta
3 tbsp butter
1/4 cup flour
1 tbsp minced garlic
2 1/2 cups milk
1 1/2 cups shredded sharp cheddar cheese
1 tbsp dijon mustard
1 tsp oregano
12 oz frozen broccoli, steamed
1-2 cups leftover ham, chopped
3/4 cup corn (canned or frozen)
1 red bell pepper, chopped
1/2 medium onion, chopped
Optional topping:
1/4 cup parmesan cheese
1/4 cup panko bread crumbs
2 tbsp melted butter

Directions:
Preheat oven to 350
Cook pasta according to package directions
Heat 3 tbsp butter in saucepan over medium heat. Once melted, quickly stir in flour, then add garlic. Pour in milk, and wisk. Let cook over stove for 2-3 minutes, until it's thickened a bit. Add in cheese, ham, oregano and vegetables. Mix pasta in with cheese mixture and pour into 9x13 inch baking dish. 
For topping, mix together butter, bread crumbs and parmesan cheese and top noodles with it. 
Bake for about 20 minutes or until outsides are bubbling.


Wednesday, May 22, 2013

Summer Squash Pizza


        Here it is, yet another pizza post. You might think (like my mom and brother did), how good can a pizza with squash on it really be? It sounds kind of odd, and most of you would probably prefer your pizza loaded with bacon and sausage instead, but I promise this is a seriously good recipe. It tastes fresh and summery and the flavors are sooo delicious. Without a doubt I'll be making this again soon, and with fresh tomatoes and squash from the garden, it'll be even 10 times better.

       Maybe I'd be especially convincing if I posted a little more like ThugKitchen(click here). That's much more similar to how I actually feel about the food I post, but I try and filter my words because I know although this blog is meant for college students, the majority reading this are probably middle aged women, and are probably recruited by my mother.....*Darn*


         Would people really be offended if I said this is a f*cking good pizza? Because it really really is. At least I'm not lying about it (my dad says there is nothing worse than lying) and at least I'm putting a * in there to be safe. Damn this just really is a f*cking good pizza......But I'll stop swearing now, only as long as you promise to try the recipe :)


Summer Squash Pizza
Ingredients:
1 premade pizza dough
3-4 tbsp italian salad dressing
1 zucchini, thinly sliced
1 summer squash, thinly sliced
1 large or 2 medium tomatoes, thinly sliced
1 (or more) cup mozzarella cheese
parmesan cheese
1 tsp basil
1/2 tsp oregano
salt, pepper, garlic powder
1 tbsp cornmeal

Directions:
Preheat oven to 425 degrees (if using pizza stone, place in oven before its preheated so it heats with oven and doesn't crack. this allows for crispier crust)
Heat 1 tbsp of the italian dressing in pan over medium heat on stove. Once heated, add squash and zucchini and sautee until crisp tender, about 4-5 minutes.
While squash is cooking, lightly spray cookie sheet or stone (once stone is heated in preheated oven) and sprinkle with cornmeal. Stretch dough and place on top. 
Top dough with remaining tablespoons of italian dressing, and top with sliced tomatoes. 
Top tomatoes with half of the mozzarella cheese, then zucchini and squash.
Sprinkle remaining mozzarella cheese and parmesan over the squash, and top with basil, oregano and a light sprinkle of garlic powder, salt and pepper.
Bake in preheated oven for about 12 minutes or until crust is golden and cheese is bubbling.


Sunday, May 19, 2013

Hearty Baked Breakfast Cookies

     
       So I haven't been too frequent with blog posts lately - I'm on summer vacation and I do have a life, people (or at least I like to think I do) so the recipes will most likely be a little scarce for the next few months. As a 20 year old I do tend to like the beach and sunshine a litttttle bit better than the kitchen....for the most part ;) But anyways, read away and enjoy this post because it might be a week or so before there's another one!


        I loved my No Bake Breakfast Cookies so much, and I've made the recipe like twenty times (try adding one mashed banana to the mix, my new favorite variation!) that I thought it's time to experiment with some new breakfast cookie ideas. These ones are baked, and they are soft, chewy and sweet, and so delicious! They're full of the nutrient dense ingredients, similar to the no bake recipe, making them fibrous, packed with protein, antioxidants and healthy omega-3 fatty acids. Goooooood morning to you!


       Since these cookies are so nutrient dense, they aren't so low in calories. Having one or two for breakfast is a good way to sustain some energy and keep you full until lunch (taste great with a cup of coffee). They are also a great pre/post workout or mid-day snack.
       As always, the recipe is very flexible. You can substitute wheat germ for ground flax meal, agave nectar for honey, any nut butter for peanut butter, any dried fruit for the cherries, applesauce for the oil (lessen the fat content), any kind of chip for the chocolate chips, and any kind of nut for the ground walnuts. So basically do whatever the hell you want and they'll still be super good! Unless you do something totally weird with it, but then I guess that's your fault not mine :P


Hearty Whole Wheat Breakfast Cookies
Makes about 2 dozen
Ingredients:
I cup walnuts
1 1/2 cup rolled oats
1/3 cup whole wheat flour
1/2 cup ground flax meal
1 tsp baking soda
1/2 tsp salt
1 tsp cinnamon
1/2 cup peanut butter
1/4 cup vegetable oil
1/4 cup honey
1/3 cup brown sugar
1 egg
1 tsp vanilla
1/2 cup dried cherries
1 cup chocolate chips

Directions:
Preheat oven to 375 degrees.
Pulse walnuts in food processor until they become the texture of coarse flour.
Mix walnuts, oats, flour, flax meal, baking soda, salt and cinnamon in medium bowl.
In food processor, pulse peanut butter, vegetable oil, honey, brown sugar, egg and vanilla a few times just until mixed together.
Mix peanut butter mixture with oat mixture until just blended. Fold in cherries and chocolate chips.
Shape heaping tablespoons of the dough into balls and place on cookie sheet. 
Bake in preheated oven for 8 minutes or until lightly browned, remove from oven and push down with spatula to form cookie. Let stand on cookie sheet for a few minutes then move to wire rack to cool.


Om nom nom nom nom...


Monday, May 13, 2013

Curried Butternut Squash

         Im a big fan of butternut squash. It's sweet and delicious and super healthy for you. To digress from my usual recipe, I decided to add in some curry powder to spice it up a bit, and boy was it good!
          It's an awesome side dish or a really healthy snack. I cut them into the shape of thick little french fries, but you could cut them up smaller/thinner to have them crisp up easier.
          I never realized how well butternut squash and curry go together, but I'm sure this will spark some great new recipes to try! I served these with crispy chicken drumsticks and it was a quick and easy meal that was satisfying and delicious. Gotta love the simple things!

Curried Butternut Squash
Ingredients:
1 butternut squash - peeled, seeded and cut into 1/2-1inch cubes or "fries"
1 tbsp olive oil
2 tsp curry powder
1/2 tsp garlic powder
1/2 tsp cinnamon
1/4 tsp onion powder
Salt and pepper

Directions:
Preheat oven to 425
Toss squash with all ingredients to coat. Spread out flat on baking sheet and cook in preheated oven for about 20-25 minutes or until tender and browned.


Friday, May 10, 2013

Black Bean and Corn BBQ Pizza


       Before I get into talking of the absolute deliciousness of this pizza, I'd just like to throw out there that I've made the stuffed mushrooms twice since my last post.....I'm in love....obsessed.... Please do yourself a favor and make the damn things, you won't regret it! Click Here :)    
       So I know right when my mom reads this post she's going to think "Omg I remember eating that pizza, Erica needs to make it again for us at home!" and that's totally okay with me because I definitely wouldn't mind eating more of it soon. Actually to be honest I could probably eat this pizza every week for the rest of my life and never get sick of it. (That might be an exaggeration but the point is that it is a reaaaalllly good pizza)


The toppings are really cheap which is always a plus! Just pop open a few cans (that are often hiding in the back of the cabinet) and you are good to go!


And only minutes after the first picture was taken.....

         
        It seems like kind of odd toppings for a pizza, but I'm confident that it will surprise you with how delicious it is. The corn gives such a sweet crunch and the beans and tomatoes add great texture as well.....and of course you can never go wrong smothering something with cheese and BBQ sauce (Sweet Baby Ray's!) My boyfriend swears on having meat with every meal, and likes to have chicken or bacon or something on his pizza, and even he approved and said it really surprised him how great it tasted! I promise you'll love it :)


Tip - make sure if you're using a pizza stone you put the stone in the oven, then preheat the oven and let the stone heat up as the oven heats (to prevent it from cracking). The hot pan gives the bottom of the pizza a crisp crust so it's not all soggy! 


BBQ Black Bean and Corn Pizza
Ingredients:
1 premade pizza dough
2 tbsp cornmeal
Approx 1 cup favorite bbq sauce (plus more for topping if desired)
1/2 can black beans, drained and rinsed (about a cup)
1/2 can corn, drained 
1/2 can petite diced tomatoes, drained
1 1/2 cups mozzarella cheese
garlic powder to dust

Directions:
(If using pizza stone, place in oven) Preheat oven to 425 degrees
Once preheated, remove pan from oven if using stone, and top with cornmeal. You can spray lightly with cooking oil beforehand to prevent sticking. Stretch dough and place on top of pan. Top with BBQ sauce, 1 cup of cheese then the beans, corn and tomatoes. You may use more or less of the ingredients depending on preference. (I like mine loaded!) Top with the remaining 1/2 cup of cheese and swirl more BBQ sauce on top if desired. Dust lightly with garlic powder and cook in preheated oven for about 15 minutes or until crust is golden and cheese is bubblin!


Wednesday, May 8, 2013

Scrambled Egg Grilled Cheese Sandwich


       I always make fried egg sandwiches, (the typical bacon egg and cheese) but this may have just converted me. Some scrambled eggs and cheese stacked between two pieces of bread and grilled. So simple, why hadn't I thought of it before....does everyone do this, and I just haven't heard of it?!


           Since the idea popped up, I've made at least 3 or 4 and they have always been delicious. It's too easy to mess up! It's perfect for a cheap finals week breakfast/lunch and the potential ingredients, as always, have endless options. I have made one with spinach and one with green pepper and so far the pepper is my favorite....I love the crunch! Try it with any vegetables you have on hand.


Sometimes I think it's silly to blog about such easy recipes, but then again, everyone cooks in different ways and often the simple ideas are overlooked!


Scrambled Egg Grilled Cheese Sandwich
Ingredients:
2 pieces bread
butter
1 tsp olive oil
1/4 cup chopped bell pepper*
1 tbsp finely chopped onion
1 or 2 eggs (depending on how hefty of a sandwich you want)
heaping 1/4 tsp garlic powder
salt and pepper to taste
1/3 cup shredded cheddar cheese

Directions:
Heat olive oil in pan over medium heat and add vegetables, cooking for 2-3 minutes. Scramble eggs in small bowl with garlic powder and salt and pepper. Add eggs to pan with vegetables and cook 3-4 minutes. Place eggs on toast, top with cheese, and spread butter on the outsides of the bread. Remove any excess egg from pan and grill sandwich on medium heat or until golden brown or desired crispiness. Serve with ketchup or hot sauce.


Monday, May 6, 2013

Balsamic Bruschetta Chicken Sandwich


      One of my favorite appetizers/snacks is balsamic bruschetta crostinis - just cut up a baguette, toast the pieces and top them with a mixture of diced tomatoes, balsamic vinegar and feta cheese (I'll post a recipe another time!). I was craving those flavors but I needed something more substantial considering it was dinner time, so I thought I might as well press it all into a hearty grilled sandwich and serve it with some baked sweet potato fries.


     For two sandwiches I used about a half a can of italian style petite diced tomatoes draining out the juice, but you could also slice up some fresh tomatoes (might be less messy to work with, I'd recommend that instead). That's probably what I would have done if I had any on hand! It's an easy meal but it has a ton of flavor, and especially with a side of sweet potato fries, it's very filling and satisfying. Be sure to put it all between some whole wheat bread for extra nutritional value!


      Another option, instead of pulling the chicken and mixing it with the sauce, is to pound the chicken thin, season with garlic powder and pepper, marinate with balsamic vinegar and olive oil for a few hours before cooking and cook on stovetop until juices run clear. Cut into small slices and complete recipe as follows.


Pulled Balsamic Bruschetta Chicken Sandwich
2 sandwiches
Ingredients:
1 chicken breast
4 pieces whole wheat bread
2 tbsp butter
3 tbsp balsamic vinegar
2 tsp minced garlic
2/3 cup petite diced tomatoes, drained of juices (or 4-6 slices of fresh tomato)
1 tsp basil
1 big handful spinach
1/3 cup feta cheese
Salt and pepper to taste
Directions:
Cut chicken breast into 3-4 pieces and bring to a low simmer in large pot of water over stove with 1/2 tsp of salt. Let cook for about 10-15 minutes (don't bring to a rapid boil because chicken can easily over cook and become tough) and check to make sure its cooked all the way through and no longer pink. Once done, remove chicken from pot and shred with two forks on cutting board. Mix together with balsamic vinegar and garlic and season with salt and pepper. Butter one side of each piece of toast (the outside that will be touching the pan/grill) and, as shown in above picture, top with chicken, tomatoes sprinkled with basil, feta cheese and spinach and top with bread. Use George Forman style grill or heat on pan over stove to crisp bread, about three minutes each side.


Saturday, May 4, 2013

For the Love of Crab Cakes!


     I've made crab cakes more times than I can count on my fingers and toes, and I think the only reason I haven't blogged about them yet is because they are all eaten too quickly for me to take pictures. Not to toot my own horn or anything, but these are beyond great. Crispy crunchy on the outside and soft and tender in the middle, that's my kinda crab cake.


        Now you may ask, how does a poor college girl like myself have the funding to make such a dish? Well the secret is canned crab, and to be honest, I've used the cheapest can on the shelf (1.99 for 6 oz) and when it's all mixed with seasonings and fried to crisp perfection, you'd have no idea. I serve it with a simple corn salsa and a smoky lemon aioli. The flavors go SO well together all in one bite, with the crunch of the sweet corn and peppers, a little kick from the creamy aioli and the crisp, salty and sweet crab cake....its absolutely delicious.

         What is seemingly a fancy and expensive dish, in all actuality, is very simple to make and affordable. Serve with a salad of mixed greens and some veggies and call it dinner!


Crab Cakes w/ Corn Salsa and Smoky Lemon Aioli
Makes approximately 9 cakes
Ingredients:
1/2 cup vegetable oil- for frying
2 6oz cans crabmeat, drained of all liquid
1/3 cup plus 1 tbsp breadcrumbs
1 egg, lightly beaten
2 tbsp finely chopped onion (green onions work too)
1/3 cup very finely chopped bell pepper
1/4 cup mayonnaise
1 tbsp lemon juice
1/2 tsp garlic powder
1/2 tsp old bay seasoning

For aioli:
1/2 cup mayo
1 tbsp lemon juice
1 tsp cumin
1/4 tsp cayenne pepper
heaping 1/4 tsp garlic powder
heaping 1/4 tsp black pepper
salt to taste

For Corn Salsa:
1 cup corn
1/3 cup chopped bell pepper
1/2 tbsp olive oil
1/4 tsp onion powder
Salt and pepper to taste

Directions:
First make aioli and salsa to let flavors set. For each, in separate bowls, mix together all ingredients listed and put in fridge. 
To make crab cakes, heat vegetable oil in large pan on medium heat (level 5-6). Make sure the crab meat cans are thoroughly drained of all liquid, and put in medium bowl. Add in rest of the ingredients and mix until combined. It will be a pretty wet mixture. Use hands and shape mixture into about 9 patties, about 1/4 cup each. Put into heated oil and cook about 4-5 minutes on each side or until crisp golden brown. (The crabmeat is precooked so don't worry about cooking through) Remove from oil and set aside on paper towel over plate to drain. Serve with salsa and aioli.


Thursday, May 2, 2013

Creamy Stuffed Mushrooms


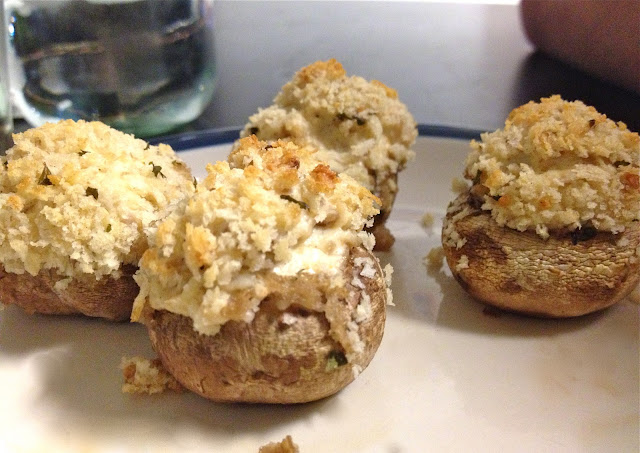
      These are seriously one of the best stuffed mushrooms I've ever had - if not THE best. I can at least say they are the only stuffed mushrooms I've found myself day dreaming about days after eating them, wishing I could have more, and the boys who ate them with me have said the same thing. They were deliciously creamy and cheesy, yet crunchy from the bread crumbs and spicy from cayenne pepper. It's the ultimate finger food, appetizer, or in our case weekend late night snack ;) I've gotten pretty skilled at cooking late after being out all night on the weekends (I'm a college kid so you know what I'm talkin about). Last weekend we ended up making a sandwich with guacamole, cheese, leftover pork, mashed sweet potatoes, cheddar cape cod potato chips and bbq sauce. It sounds weird but it was seriously good! Oh the things you think of at 2 am.....


That's true college improvisation right there.....but anyways, back to the mushrooms!


        These are dressed up and fancy enough for a special occasion, yet cheap and easy enough for any time of the week. You can even make them ahead of time and refrigerate or freeze for later, depending on when you plan on making them. Even my friends who don't like mushrooms all too much loved these. The creamy cheesiness all stuffed in the mushroom and oozing down the side with crispy crunchy breadcrumbs, MmmMmm! They're too good. I highly recommend doubling the recipe because I promise they're sure to be devoured quickly....


Now that's something you don't see very often, Charlie bringing me food. I had to capture this rare moment...


Creamy Stuffed Mushrooms
Ingredients:
12 white mushrooms 
1 tbsp olive oil
6 oz cream cheese, softened
1/3 cup parmesan cheese
heaping 1/4 tsp cayenne pepper
1/2 tsp garlic powder
1/4 tsp onion powder
1/2 tsp oregano
salt and pepper to taste
1/3 cup panko style breadcrumbs


Directions:
Preheat oven to 375
Wash mushrooms removing any dirt, and dry. Remove stems from mushrooms, (cut off any tough ends) and finely chop stems. Head olive oil in pan on stove over medium heat and add mushrooms with half (1/4 tsp) of the garlic powder. Once they're soft and liquid has evaporated, set aside to cool. 
Once cooled, mix together mushrooms, cream cheese, parmesan cheese, cayenne pepper, remaining garlic powder, onion powder, oregano and salt and pepper. Stuff mushrooms with mixture, they should be overly full - the more stuffing the more ooey-gooey and cheesy :) 
Roll the stuffed portion of the mushroom in the breadcrumbs to top. Bake in preheated oven for about 20 minutes.


Wednesday, May 1, 2013

Loaded Pork Fried Rice


      What the heck do you do when you have two pork chops in your freezer?! That's a pretty skimpy dinner for two and I'd hate to try out some new delicious recipe on just two chops and be begging for more at the end. Well, with my recent mood for takeout food and the coincidental leftover 4 -ish cups of rice, I had found a solution to my dilemma, and a hell of a good solution it was. If only it came with a fortune cookie....


     In all honesty this was way better than any fried rice I've ever gotten from a restaurant. I really love Chinese take-out style meals because they come together so quickly and it's all in one pan (perfect for the messy cook that I am!). I loaded it with veggies and used brown rice, making it healthier than your average Happy China Buffet down the street. What's really great about it is the big chunks of pork. (Not those little red pieces that usually come in it. Who knows what part of the pig that even comes from....)

       I marinated the pork just a few hours before in a little bit of soy sauce, olive oil, teriyaki sauce and some spices. It was extremely flavorful and really made the rice dish that much more delicious. As usual, I just used what I had on hand, but you could add any kind of vegetables to the mix and it would work fine, too!


        This was a great quick meal for the busy week I've been having with tests coming up and spending the majority of my precious time in the library, contemplating dropping out of school and moving to some rural area and living off the land and never opening a text book or looking at stupid database systems again in my life....I'd take my dog with me too, if my mom would ever let me...


    She'd be real fat if she lived with me because I'd have no willpower to say no to that face. I bet she'd enjoy some pork fried rice.....God, I miss her!


Loaded Pork Fried Rice
Ingredients:
About 4 cups cooked brown rice (leftover works great)
2 pork chops 
1 tbsp olive oil
1 tbsp reduce sodium soy sauce
1 tbsp teriyaki sauce
few shakes garlic powder and pepper
2 eggs, scrambled
1 tbsp sesame oil
1/3 cup chopped red bell pepper
1/3 cup chopped green bell pepper
1/3 cup chopped carrots
1/3 cup chopped onion
1 tbsp minced garlic
1/3 cup reduced sodium soy sauce
Garlic powder, onion powder and pepper to taste

Directions:
Season pork chops with few shakes garlic powder and pepper on each side. Place in ziplock bag, add olive oil, soy sauce and teriyaki sauce and marinate in fridge for a 1+ hours. Heat pan over medium heat, cook scrambled eggs separating into small pieces and set aside. Cook pork chops in pan with all the marinade, about 4-5 minutes on each side or until just cooked through. Remove from pan and set aside but leave drippings in the pan. Add tbsp of sesame oil to pan give it a few seconds to heat up, add minced garlic and the chopped vegetables. Stir to coat in drippings and oil and let cook for about 4 minutes. While cooking, chop the pork into bite sized pieces. Add rice to pan with vegetables and stir in pork and egg as well. Mix in soy sauce and season with garlic powder, onion powder and pepper.