Saturday, March 30, 2013

Loaded Oats N' Blueberry Breakfast Cake


       My mom makes this cake all the time at home and with students of her home-ec class (6-8th graders, so come on, anyone can do it!) and it's great for breakfast........or dessert ;)


        Of course she has adapted the recipe to include whole wheat flour and oats, and she doubled the usual amount of blueberries, so although it is considered "cake" there is still good nutritional value! She is so good at altering recipes and making things healthy, but they still taste really good. It's moist, flavorful and sweet, and paired with a glass of milk...there isn't much better!


With sweet, juicy blueberries in every bite, it's such a delicious treat! 


Oats N' Blueberry Breakfast Cake

Ingredients:
1 1/3 cup all purpose flour
1 1/3 cup whole wheat flour 
1 1/2 cup quick cooking oats
1 Tbsp plus 1 tsp baking powder
1/2 tsp salt
1 1/2 cups sugar
2 eggs
1 1/2 cup milk
1/2 cup vegetable oil
2 cups blueberries
1-2 tbsp Cinnamon sugar to top


Directions:
Preheat oven to 400 degrees.
Put flour, oats, baking powder, salt and sugar into large bowl and combine with wire wisk. In separate bowl, whisk together the eggs, milk and oil. Make a well in the dry ingredients, pour in milk mixture and mix until just combined. Do not over mix. Gently fold in blueberries. Spread batter into lightly greased 9x13 inch pan. Top with cinnamon sugar.
Bake in preheated oven for 25-30 minutes. 


Enhanced Ramen Noodle Stir Fry with Peanut Sauce

       Everyone knows ramen noodles are a staple in a college diet, mainly because how ridiculously cheap they are - but they are extremely high in sodium and basically have no nutritional value. I figured because this is a blog based on food for college students, I had to do my own spin off of ramen noodles, so I tried making them healthier and of course tastier (yet still easy). With a quick frozen oriental veggie stir fry and a simple sauce, these taste much better than regular ramen noodles and are great for lunch or even a vegetarian dinner! (or if you want meat, add some chicken!)
            Best thing is, it tastes great yet it's still a bargain meal because frozen vegetables are cheap and the sauce uses only small amounts of ingredients that you probably already have! So next time you're looking to boil up a package of ramen, think to add some veggies and discard most of the seasoning package.... Gooooodbye sodium!

-Hint- Ramen noodles cook very fast, and if you boil them for too long they become mushy (not good) so really only boil them for 2-3 minutes max!

Also, if you want them spicier, add 1/4 tsp cayenne pepper to the peanut sauce mixture

Enhanced Ramen Noodle Stir Fry w/ Peanut Sauce
Ingredients:
1 16 oz pkg frozen oriental vegetables
1 tbsp olive oil
2 cloves garlic, minced
2 pkg ramen noodles (w/ approx 1/3 of a seasoning packet)
2 1/2 tbsp natural peanut butter
1 tbsp reduced sodium soy sauce
1 tbsp honey
2 tsp sesame oil (olive oil works too)
2 tsp chili sauce (siracha or regular - more or less to taste)
1/4 tsp onion powder
salt and pepper to taste

Directions:
Heat tbsp of oil over medium-high heat in pan over stove. Add garlic and stir, then add vegetables. Cook, stirring constantly until vegetables are heated through, about 7-8 minutes and season with about 1/3 of a seasoning packet. Boil noodles according to package directions (no more than 3 minutes) and strain. Mix together peanut butter, soy sauce, honey, oil, chili sauce and onion powder salt and pepper. Toss noodles, sauce and vegetables together and serve.

Friday, March 29, 2013

Italian Sausage Pepper and Onion Subs


        Sandwiches are probably my favorite kind of food. There are endless possibilities of combinations - subs, wraps, whole wheat, white, rye, toasted, grilled, pressed and stretching with melted cheese, globs of sauce and veggies fall out as you take a big bite - Oooooh yeaaaaah! One of my favorite kinds is a good old fashion, fair style sausage pepper and onion sub. Spicy sausages, sweet peppers, crunchy onions and juicy tomatoes all soaked up in a marinara sauce seasoned with italian herbs and covered in cheese. What's better than that?! Well the fact it's cheap, easy to make and stays great for leftovers definitely makes it a great (and delicious) college food.


            One package of Johnsonville sausages and two peppers (one of them was abnormally large, nearly the size of my head- like it was some kind of alien pepper, so basically three peppers) made a ton of food that made two big subs for dinner and leftovers for lunch for three to four days.

            You could even make it with frozen veggies, though fresh is always recommended, but either way will work. We put ours on whole wheat subs to boost the nutritional value a little bit (sausages surely aren't the greatest thing for you...) and topped it with some feta cheese, because I'm obsessed.


        Plus it's a one pot meal - and for someone who is notorious for making messes in the kitchen, it's my kind of dish! Oooh and it smells deliccccious while cooking! Especially if you toast the buns in the oven with a little garlic...Mmmhmm

The recipe serves 4-5 for large dinner sized subs, more for smaller lunch meals


Italian Sausage Pepper and Onion Subs

Ingredients:
1 pkg spicy italian sausage (19oz)
2 tsp olive oil
1 tbsp minced garlic
1 green bell pepper
1 red bell pepper
1 yellow bell pepper (optional)
1 onion
1 14oz can italian style diced tomatoes
1/2 cup tomato sauce
1/3 cup white wine
1 tbsp italian seasonings
(or 1 tsp oregano, 1 tsp thyme, 1 tsp basil)
1 tsp onion powder
1/2 tsp salt
1/2 tsp pepper
1/2 - 1 tsp red pepper flakes (optional)*
1 cup cheese - (feta, cheddar, mozz, etc!)
Whole wheat sub rolls
Butter
Garlic powder

*The sausages are fairly spicy themselves, but they mild out a little when cooking in the sauce. If you are looking for a spicy sub, add the red pepper!


Directions:
Cook sausages according to package directions. While they are cooking, julienne peppers, then cut once in half and slice onions. Remove sausages from pan, set aside and drain, then add olive oil in pan over medium heat. Once hot add garlic, peppers and onions to the pan. Stir constantly until they've softened (about five minutes). Add marinara sauce and tomatoes and cook, stirring, for another couple minutes then add wine. Chop the sausages to bite sized pieces and add back to the pan along with all seasonings. Bring sauce to a low boil then reduce to low, simmer and cover. 
While simmering, cut sub rolls in half, spread with butter and sprinkle with garlic powder. Bake in oven at 350 degrees for about seven minutes or until butter is melted and they are toasted. If you are using cheddar or mozzarella cheese, you can melt the cheese on the buns while toasting. Once crisp, remove from oven and top with sausage mixture.


Tuesday, March 26, 2013

Baked French Fries w/ Sun-dried Tomato and Garlic Aioli

      I've never made homemade baked fries before, and to stray away from the deep fryer we decided to give it a shot. We made these baked fries to accompany avocado stuffed burgers and they were so delicious and simple. I made a sun dried tomato and garlic aioli to go with them and it was so good as well! It's sweet but you can add a kick with cayenne pepper or chili powder and it is super tastey - it also goes GREAT on a burger, especially with avocado! (There's something about avocados and sun dried tomatoes...MmmmMm I'll have to work more with that combination!)

  
       Baking them at a high temperature still allows them to crisp up nicely, and with such a flavorful sauce, deep frying them really isn't necessary! (Never thought I'd say that...) Only three potatoes makes a large cookie sheet full! That would generally feed four or so people as a side, but we were real hungry.....I'd be ashamed to say only two of us ate the whole pan buttttt I'm not because they were too good! Addicting! It's not my fault!

So next time you're thinking of deep frying some fries, turn the oven on instead! 

Baked French Fries
(To make a large cookie sheet full)
Ingredients:
3 medium baking potatoes
3 tbsp olive oil
1 tsp garlic powder
1 tsp onion powder
1/2 tsp paprika
1/2 tsp chili powder
salt and pepper to taste

Directions:
Preheat oven to 450 degrees. Peel potatoes (optional) and cut into slices of desired thickness (1/4 inch-1/2 inch). Toss in bowl with olive oil and spices to coat. Spread flat on baking sheet and bake in preheated oven for about 30 minutes - depending on thickness - taking them out to turn every 8-10 minutes. 


Sun-dried Tomato and Garlic Aioli
Ingredients:
1/2 cup mayo
1/4 cup sun dried tomatoes
1/2 cup boiling water
2 cloves minced garlic
1/2 tsp garlic powder
1 1/2 tsp lemon juice
1 tbsp olive oil
salt and pepper to taste
1/4 tsp chili powder
heaping 1/4 tsp cayenne pepper (optional)


Directions:
Soak tomatoes in boiling water for about five minutes. Remove and chop. Put mayo, tomatoes, olive oil, lemon juice and garlic in food processor and process until tomatoes are small chunks. Stir in garlic powder, salt, pepper, chili powder and cayenne. 


Monday, March 25, 2013

Chocolate Chip Muffins w/ Whole Wheat Flour and Wheat Germ

       I LOVE MUFFINS!! Muffin tops, muffin bottoms, fresh out of the oven or stored for a quick grab and go breakfast - I could seriously eat three at a time. I used to love getting the bakery muffins that are huuuuge, dense, sweet and loaded with fat and sugar (more like a cake than a breakfast food), but if you're gonna indulge on a muffin, you might as well go big and treat yourself. This recipe is one that I have altered to include whole wheat flour and wheat germ, to make it at least a little bit healthier - but you'd never know it. I also use brown sugar as well as white and that really gives it a nice flavor.


       They're definitely one of the best chocolate chip muffins I've ever made and I'm sure those who've eaten them would agree. I'll have to try it with blueberries or other additives sometime soon!


Chocolate Chip Muffins w/ Whole Wheat Flour and Wheat Germ
Ingredients*:
1 cup all purpose flour
3/4 cup whole wheat flour
2/3 cup wheat germ
2 tsp baking powder
1/3 cup sugar
1/3 cup brown sugar
1 stick butter (half cup) melted
1/2 tsp salt
2 eggs, lightly beaten
2/3 cup milk
1 tsp vanilla
1 1/2 cup chocolate chips

Directions:
Preheat oven to 400 degrees and grease 12 muffin cups. Mix together flour, baking powder, sugars, wheat germ and salt. In a separate bowl slowly mix together milk and melted butter. Add eggs and vanilla. Make a well in dry ingredients, pour in milk mixture and stir until just combined. Fold in chocolate chips and fill muffin cups. Bake for 15-17 minutes. 

*If you want to reaaaaally treat yourself, before baking, top the muffins with this mixture:
1/4 cup sugar, 2 tbsp flour, 2 tbsp butter, 3/4 tsp cinnamon
Or be creative...try adding nuts, coconut or dried fruit!


Sunday, March 24, 2013

Mom's Famous Spicy Noodles (Whole wheat)


       My mom has been frequently making these noodles since I can remember and they are all my friends' favorite. She will literally make 3 entire boxes of noodles and it will be gone within a couple days - we go crazy over it. My friends will come over and literally the first thing they say is "do you have spicy noodles!?" It is an awesome snack (Recommended to eat cold - how much easier can you get?!) and it stores great in the fridge for days.

        I made it for my friends at college to see if they'd like it as much as my friends from home, and lets just say after one late friday night, over an entire pound of pasta was gone (regretted in the morning). They're so good it's dangerous...


        As a college kid, this is something I love having in the fridge because it stays good for a while - actually because the flavors have more time to absorb, they taste better after a day or two - and its perfect for a quick lunch or late night snack. They are mildly spicy (can alter to fit your taste) and have such yummy flavor! Plus unlike most Asian style noodle recipes, we use whole wheat pasta. 

If you're looking to make a meal, just add some chicken and broccoli and you're set! 


Mom's Best Spicy Noodles
Ingredients:
1 lb box whole wheat thin spaghetti noodles
1 tsp red pepper flakes
1/3 cup sesame oil
1/3 cup honey plus 1 tbsp
1/3 cup reduced sodium soy sauce
3/4 tsp salt
1/3 cup cilantro, chopped
1 bunch green onions
3/4 cup chopped peanuts

Directions:
Cook pasta to al dente, drain well. In a small saucepan, put sesame oil and red pepper flakes over medium heat and cook for two minutes, being careful not to burn the pepper. Remove from heat and stir in honey, soy sauce and salt. Toss with pasta in large bowl and refrigerate until cooled. Add in green onions, peanuts and cilantro. Serve cold


If you don't have whole wheat pasta on hand, it does work with regular pasta as well. I have tried with angel hair and it was delicious! Whole wheat is recommended, though.


Saturday, March 23, 2013

S'more Peanut Butter Blossoms


         I've always loved peanut butter blossoms, the cute little cookies with a hershey kiss on top. Chocolate and peanut butter is just an unbeatable combo, but these cookies are even better when you add a marshmallow on top. 


      It adds a whole new element to the appearance and the taste - they're soft, chewy and sweet and you can decorate them with colored sugar to fit any occasion! They're just a crowd pleasing dessert, everyone loves them. I made these for St. Patrick's day, so I colored mine green. They're easy, you can just use a bag mix and they're seriously good!


S'more Peanut Butter Blossoms
Ingredients:
1 pouch peanut butter cookie mix
3 Tbsp vegetable oil
1 tbsp water
1 egg
1/3 cup sugar
13-15 large marshmallows
2 drops color food dye
25-30 hershey kisses


Directions:
Preheat oven to 375 degrees. Mix together peanut butter mix, oil, water and egg until combined. Shape dough into about 25-30, tablespoon sized balls and dip just one side in the sugar. Line on ungreased cookie sheet and bake 10-12 minutes, just until edges lightly brown. While cookies are baking, mix together food coloring and sugar (same sugar you dipped the dough in) in a plastic bag, working it with your hands until all sugar is dyed. Cut each marshmallow into halves (or thirds if you want smaller) and dip the sticky side in the colored sugar. When cookies are done, immediately top with marshmallow and put back in oven just for a few seconds to allow marshmallow to soften. Immediately top with hershey kiss when marshmallows are still soft.  


Friday, March 22, 2013

White Chicken Chowder Style Chili


        I am a girl who loves her chili. Meat, beans, veggies, MmmMmm. But I always thought that chicken chilis were just O.K, they were never my favorite. I didn't like how it seemed to be more like a soup. The chicken also I feel like is often kind of dry - but follow the cooking directions and keep it to a simmer instead of a boil and you'll avoid all that! This recipe so turnt me on to chicken chili so I hope it does the same to whoever tries it!

         I decided to try and thicken it a little bit, so basically it is halfway between and chili and a chowder. It's loaded with the essentials- beans, corn, peppers and some heat - but I did so without adding any cream to the mix, just a can of condensed cream of chicken soup was perfect! I made a huge pot and my family was downing leftovers for days. We all loved it so much. I think my mom told me how much she loved it at least three times a day for like a week. My brother was even taking out just the chunks and making nachos with it.....


They were sooo delicious....too delicious....

        It is cheap, healthier than a beef chili and extremely simple. It's loaded with veggies and you can always add more than the recipe states! That's another great thing about chili, the recipes are so flexible. Feel free to change it up!


White Chicken Chowder Style Chili
Ingredients:
1 1/2-2 lbs chicken breast
1 tbsp olive oil
1 medium onion, chopped
1 tbsp minced garlic
1 green bell pepper, chopped
1 red bell pepper, chopped
1-1 1/2 can corn
2 can cannellini beans or other white bean, drained and rinsed
1 14oz can chopped green chilis
1 can condensed cream of chicken soup (onion or mushroom works too)
3 1/2 cups reduced sodium chicken broth
1 tbsp cumin
1 tbsp chili powder
1/4-1/2 tsp cayenne pepper
1/2 tsp onion powder
1/2 tsp paprika
1/2 tsp salt
1/2 tsp pepper


Directions:
Put large pot of water over medium heat. Cut chicken breasts once lengthwise and add to water. Bring to a simmer (hardly boiling at all because you don't want the chicken to overcook and get dry and tough- it happens quickly) for about 15 minutes. Remove from water and shred chicken with two forks. In a large pot over medium heat add olive oil, garlic and onion. Stir just about a minute then add peppers for two minutes more. Add in chicken, all seasonings, cream of chicken soup and broth. Bring to a low boil, reduce heat to low and simmer for 15 minutes. Add in the rest of the ingredients, stir and cover until heated through.


Tuesday, March 19, 2013

Guacamole for Breakfast?!

      My sister Shauna shared with me that she often makes this for breakfast (she loves to cook as well so we're always talking about food....always) and we thought it is a perfect college-kid friendly recipe, and I've explained before my family's intense love for guacamole. I'd say it's pretty much worth it's weight in gold and yes it is totally appropriate for all meals of the day....breakfast, second breakfast, elevensies, luncheon, afternoon tea, dinner, supper! (If you aren't a Lord of the Rings fan, A. you should be and B. you might not be familiar with hobbit meal times)


Hahaha they make me laugh, such great characters. And wow I'm so easily distracted - I just went off on a youtube spree of Lord of the Rings movie scenes....but back to the important stuff, food... YES.


         It's quick, filling and tasty, such a perfect breakfast. Creamy, cheesy, gooey deliciousness with a spicy kick atop a crisp piece of toast. Eat it with a fork or eat it with your hands, top it with hot sauce and add some ham or bacon!


        Or take some leftover steak and put it all in an english muffin! (We used some pretty darn expensive leftover ribeyes so it was insanely delicious) There are tons of options other than just traditional bacon egg and cheese, but with the cheap college kid budget in mind, we can just stick to the basics. But here's just a little tease....


      Here's the most basic recipe, but feel free to add any meat or veggies!

A tip - it is veryyyy good with a fresh homemade bread, but I have made it plenty of times with regular whole wheat toast. Still super yummy :)


Open Faced Egg and Guacamole Sandwich (2)
Ingredients:
2 pieces of whole wheat toast
1 ripe avocado
2 tsp lemon juice
1/2 tsp garlic powder
1/2 tsp cumin
1/4 tsp onion powder
salt and pepper-to taste
hot sauce to-taste (optional)
2 eggs
small handful cheddar cheese (preferably mexican style)

Directions:
Cut avocado and remove pit. Scoop out insides into a small bowl and mash with lemon juice, hot sauce and seasonings. Fry egg in pan over medium heat and top with cheese to let melt. Spread guacamole on toast and top with egg. (Keep the yolk runny! Thats the best part!)


Monday, March 18, 2013

Brown Sugar Salmon with Spicy Corn Salsa


      Tender, flaky fish. What's better? Maybe tender, flaky fish with a brown sugar glaze...that sounds pretty good. But what if we top that with some spicy, smoky corn salsa with black beans and crisp juicy peppers?! Oh yes, now we're talking. This dish is absolutely delicious, and I think the picture says a thousand words....


Even the cat loved it....


       The best thing is, it is super easy. Fish cooks up so fast and the salsa only takes a minute so it is a really quick meal! It was definitely one of the best salmon dishes I have had in a while! If you plan on splurging on a meal, salmon is a great thing to drop some money on. First and most important thing it is delicious! Secondly, it is extremely healthy for you with loads of vitamin B6, B12, lean protein and omega-3 fatty acids.


Brown Sugar Salmon with Spicy Corn Salsa
For Salmon-
1-1 1/2 lb salmon
salt and pepper
1 tsp paprika
2 tbsp brown sugar
2 tsp dijon mustard
1 1/2 tbsp reduced sodium soy sauce
1 tbsp olive oil
2 tsp minced garlic

For Salsa-
1 can corn, drained
1 can black beans
1/2 green bell pepper
1/2 red bell pepper
1 tbsp olive oil
1 tbsp cumin
1 1/2 tsp chili powder
1/4 tsp salt
1/2 tsp pepper
1 tsp garlic powder
1/2 tsp onion powder

Directions:
Preheat oven to 415 degrees
Prepare salsa first to let flavors absorb. Dice peppers and mix together with corn and beans. Add olive oil and seasonings and mix together. Set aside.
Pat salmon dry and season with salt, pepper and paprika. Put in preheated oven for ten minutes. While it is baking, mix together brown sugar, mustard, soy sauce, garlic and olive oil. Remove from oven after ten minutes, change oven setting to broil and brush salmon with glaze, giving oven time to heat up. Place back in oven for 2-3 more minutes or until salmon is tender. 
Serve with salsa.


Thursday, March 14, 2013

Healthy Banana Oat Bread

       I don't think I mentioned this yet, but my mom is a home economics teacher, and she does a damn good job. Thats probably where my love of food and cooking and all things domestic (besides cleaning) comes from. When she teaches her kids cooking, she is always trying to show them how there are ways to make recipes healthier by altering the ingredients and how it is better to choose whole wheat toast with peanut butter for breakfast over fruit snacks and a capri sun (but it's fruit right?!). She has taught me countless things about nutrition growing up that influence how I cook and ensure I am getting all the necessary nutrients, though sometimes I just ignore all of that, especially when there is a deep fryer in the apartment ;)  But before I go off on a tangent about all the wonderful things in the world you can toss into a fryer, I'd like to share a recipe that my mom teaches her classes, and it's much more healthy, super satisfying and a perfect, filling breakfast meal. It's a banana oat bread, but to me it's as good as cake! (Note the plate - very fitting for a home ec class!) So don't ever throw away brown bananas, use em' up!
     My mom has altered ingredients to come up with this recipe, adding whole wheat flour, oats and lessening the amount of sugar and oil used. It's moist, banana-y (just pretend that's a real word) and sweet - but not so much to make you feel like you just ate a five pound brick for breakfast. It's fibrous so one piece fills you up and lasts you til lunch! Or if you're me, just about ten minutes until I'm back for another ;)
     Comparison - most other recipes call for less bananas, no whole wheat flour or oats, 1/2 cup of oil and 1-1 1/2 cups of sugar! Indulging in a banana bread like that every once in a while is totally fine, but if it is something on a weekly basis, changing up the recipe to be a bit more healthy would make a difference! This is way better for you and there is no lack of flavor! (Believe me I know, I would eat an entire pan in one sitting) We bake this bread in a 9x13 baking dish instead of a loaf pan, and it also works great as muffins.

Healthy Banana Oat Bread
Ingredients:
1 cup all purpose flour
1 cup whole wheat flour
1 cup quick cooking oats
3/4 cup brown sugar
2 Tbsp plus 1 tsp baking powder
1 tsp cinnamon
1/4 tsp salt
2/3 cup skim milk
2 eggs
1/4 cup vegetable oil
5 ripe bananas 

Directions:
Preheat oven to 400 degrees. 
Mix all dry ingredients in a large bowl. In separate bowl, wisk together all wet ingredients. Make a well in dry ingredients and pour in wet ingredients. Mix until just moistened. Don't over mix. Grease 20 muffin tins or a 9x13 baking dish. Pour in batter (top with some cinnamon sugar - optional) and bake in preheated oven, 16-18 minutes for muffins or 20-25 for 9x13.

*It tastes great with peanut butter!

(On a quick side note - I'd just like to say that my mom and I have been eating the leftover sweet potato shepherd's pie for lunch all week (and the white chicken chili I made - recipe coming soon!) and it still hasn't gotten old - not even close. Pleeaaase, do yourself a favor and try it because it is sooo damn good.)

Tuesday, March 12, 2013

Ampin' up the Shepherd's Pie

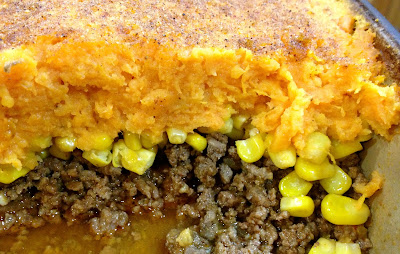
    Usually in my house we make a simple shepherds pie with just beef, corn and potatoes, and you really can't go wrong with that, but it was time for some experimenting. There has been a buzz in the food blog world about these crash-hot sweet potatoes that are like sweet potato cakes with a spiced brown sugar crust. I decided to take these flavors and make a crash-hot shepherds pie, and it was such a hit! The brown sugar sweet potatoes atop the spicy ground beef with the crunch of corn in between....mmhmm it balanced out so well! It really brought the traditional shepherds pie to a whole new level, without adding any difficulty. My mom rated it an A+, my dad really loved the new smoky flavors, and I'd have to agree with them! It was delicious!! (Not to mention simple and cheap! Good old beef and potatoes, not much better than that!)
Pictures shown are in a 9x13 inch baking dish, but the recipe is for a 2 quart casserole dish which is smaller and more college friendly.

Crash-Hot Sweet Potato Shepherd's Pie
Ingredients:
For the potatoes-
4 sweet potatoes
1 tsp salt
3 Tbsp butter, melted
1/4 cup milk
1/3 cup brown sugar
For the beef and filling-
1 1/2 lbs lean ground beef
1 medium onion, chopped
1 Tbsp garlic, minced
1 Tbsp cumin
1/2 tsp cayenne pepper
1 tsp chili powder
1 tsp paprika
1 tsp onion powder
1 cup beef broth
1 Tbsp water
1 Tbsp flour
1-2 cans corn, drained (I like a lottt of corn)
For Topping-
3 tbsp melted butter
1/4 cup brown sugar
1 tsp cumin
1/2 tsp chili powder
1/4 tsp cayenne pepper
1/2 tsp garlic powder
Directions:
Preheat oven to 375 degrees and position rack on the top 2/3 of the oven.
Peel and cut potatoes to about 1 inch thickness, place in large pot and cover with water. Bring to a boil, add tsp of salt and cook for 15 minutes or until tender. Drain potatoes, return to pot and mash. Wisk together melted butter, brown sugar and milk and pour into potatoes and mix to combine.
(While potatoes are boiling) Heat large pan over medium-high and add beef, onions and garlic. Once cooked through, drain out fat. Wisk flour together with water, then mix into beef broth. Pour into pan with the beef, and add in all seasonings. Bring to a boil until sauce thickens and pour into casserole dish. Top with corn (I like to sprinkle corn with some paprika and onion powder) and spread on sweet potatoes. Brush melted butter on top potatoes and top with the brown sugar and spices. Bake in preheated oven for 30-35 minutes. 

Sunday, March 10, 2013

Crispy, Crunchy Crab Rangoons


        Extending on my love for Chinese food as stated in the previous post, I found it necessary to blog about some delicious crab rangoons. They are better than take-out because you can use actual crab meat (no imitation stuff that comes in the airtight package that is basically all fish-generally what Chinese take-out places use) and it is still fairly cheap and easy by using canned crab. I'll even admit, I have made these using the cheapest canned crab available in the store (guilty...) and they were still so yummy! I never even use the deep fryer for these, just stovetop frying!

       I have made these up at school for friends and we will eat an ungodly amount of them. It's a no fail appetizer or side dish for parties or game days. While being home for spring break, I also made them for my younger brother and his friends, and by the looks of it they seemed to really enjoy them! I'm not sure if the number one is referring to the food or not, but we can pretend it is ;P

Also, due to the fact these deep fried snacks are not real healthy by any means, I recommend not drinking an entire gallon of store brand "Fruit Rush"with less than 1% real juice.......Oh teenage boys..


        I tried baking them as well, and they were just ok. They really only crisped up on the edges and some of the cream cheese mixture oozed out the sides. I heard about a recipe using a mini muffin tin that seemed like it worked well, so I will try that in the future and get back to you! For now I will say screw it and take the extra calories....it is soooo worth it. 


Crab Rangoons
Ingredients:
3 cups vegetable oil
1 6 oz can crabmeat, drained and flaked
1 8oz package cream cheese (try cream cheese with chives!)
1 tsp garlic powder
1/2 tsp onion powder
1/4 tsp salt
1/4 tsp pepper
24 (more or less) wonton wrappers


Directions:
Heat vegetable oil in large pan, just a little over medium heat on stove. (5-6 ish, you don't want it too hot because it's easy to cook too quick, but make sure the oil is hot enough so the oil bubbles immediately when the rangoons are put in, about 360 degrees)
Mix crab, cream cheese and spices in medium bowl. Scoop about 2 tsp in each wonton wrapper.** Wet the edges of the wrapper and fold in half diagonally to form a triangle. Pinch edges together and try to squeeze out any air. Place gently in oil and fry just until golden, about 2 minutes on each side. Remove from oil and drain on paper towel.

**Add more or less filling depending on your preference. A tablespoon is probably the maximum and you have to be careful to really pinch the sides tightly together so the insides don't ooze out.


Saturday, March 9, 2013

Sweet and Spicy Beef and Broccoli w/ Quinoa


      I seriously love Chinese food. Maybe it's partly due to nostalgia because we eat it every Christmas at my grammy's (kind of an odd tradition) but it is just so good.  Problem is, it is awfully bad for you...an even worse problem is that they don't deliver to my apartment :P   In order to solve those issues, I have come up with a healthier recipe (still pretty high in calories so don't shovel down too much, but way less processed ingredients when homemade, and much more nutritional value) that is absolutely delicious. The meat is tender, the sauce is sweet with just enough kick that goes wonderfully with broccoli, and the quinoa is a great side to absorb all the yummy flavor.


      This recipe is basically my spin off of Mongolian beef. I add some red pepper flakes to make it spicy to balance out the sweet, and serve it with broccoli and quinoa instead of just over rice with green onions. It makes a wonderful balanced meal. I've made it a few times up at school and my boyfriend loves it, but I really put it to the test by making it at home for my sister, her boyfriend, my mom and my dad. (My sister and her boyfriend are very trustable critics!) They all really loved it, so I decided I must share the recipe! The recipe serves 4-5, and keep in mind it is much easier to prepare if the broccoli and quinoa are already cooked so I recommend doing that before cooking the meat!


Sweet and Spicy Beef and Broccoli w/ Quinoa
Ingredients:
4-5 cups cooked quinoa or - 1 1/2 cups uncooked quinoa
1 Tbsp butter
1 Tbsp garlic
3 cups reduced sodium beef broth
1 tbsp olive oil
3 cloves garlic, minced (1 Tbsp jarred)
1 Tbsp minced ginger
1 medium onion, sliced
1/2 cup reduced sodium soy sauce
1/2 cup water
1/2 cup dark brown sugar
1/2 tsp crushed red pepper
1/3 cup vegetable oil
2 lbs flank steak*
heaping 1/2 cup flour**
2 tsp garlic powder
1 tsp pepper
2 large heads of broccoli, washed and chopped and steamed

*I have used this recipe with steak tips, (or steak for grilling/broiling) and it works just fine. If flank steak is not available, this recipe is still doable!
**Most recipes such as this one call for dredging the meat in cornstarch instead of flour, but I have found using flour works just as well, just add 2 tsp to the sauce at the end and bring to a boil to thicken, like the recipe states
Directions:
If not already cooked, to prepare quinoa, melt Tbsp of butter in large saucepan over medium heat. Add in minced garlic, stir for about a minute then add in quinoa, stirring constantly to toast for 2-3 minutes. Add in beef broth, bring to a boil then reduce heat to low and let simmer until liquid is absorbed, about 15 minutes. (If quinoa is already cooked, heat in microwave after last step)

Steam the broccoli and set aside.

Meanwhile, mix together flour, pepper and garlic powder. Chop steak to bite sized pieces and dredge in the flour. Set aside

 Heat olive oil over medium heat in large saute pan and add in garlic, ginger and onion, stirring for just a couple minutes. Add in soy sauce, water, brown sugar and red pepper flakes and stir. Bring to a boil, and cook for 3-4 minutes to dissolve all the sugar. Pour in bowl and set aside. 

Heat 1/3 cup vegetable oil in large pan over medium/high heat (can be the same one used to make the sauce). Shake excess flour of meat pieces and fry for just a minute or two on each side to brown. Remove from pan and drain on paper towel. Much of the oil will be absorbed but if there is some left, remove from pan. 

Pour soy sauce mixture back into pan, add two tsp of the flour mixture and bring to a boil. Add back in the meat and stir to coat with sauce. Reduce heat and let simmer for a couple minutes, add broccoli and serve over quinoa.

Matt, Shauna, Dad and Mom enjoying their meal!